


Каждая труба, шланг, клапан и сосуд, по которым проходит давление, должны доказать свою способность делать это безопасно, а каждый манометр, датчик и переключатель, измеряющий давление, должны доказать свою точность показаний. Обе задачи зависят от одного: точного и управляемого источника давления.
Вот почему высокое давление рука насос для испытания под давлением Даже в эпоху электрических насосных систем для испытаний под давлением, они остаются неотъемлемой частью мастерских, испытательных стендов и калибровочных лабораторий.
Ручной насос обеспечивает фиксированный объем вытесняемой жидкости при каждом ходе поршня, предоставляя оператору то, чего не может обеспечить механизированное оборудование: полный, пошаговый контроль над процессом создания давления.
В этом руководстве мы рассмотрим, как использовать ручные насосы для гидростатических испытаний и калибровки приборов, как выбрать подходящий насос и каких ошибок следует избегать.
Почему ручные насосы высокого давления идеально подходят для испытаний под давлением?
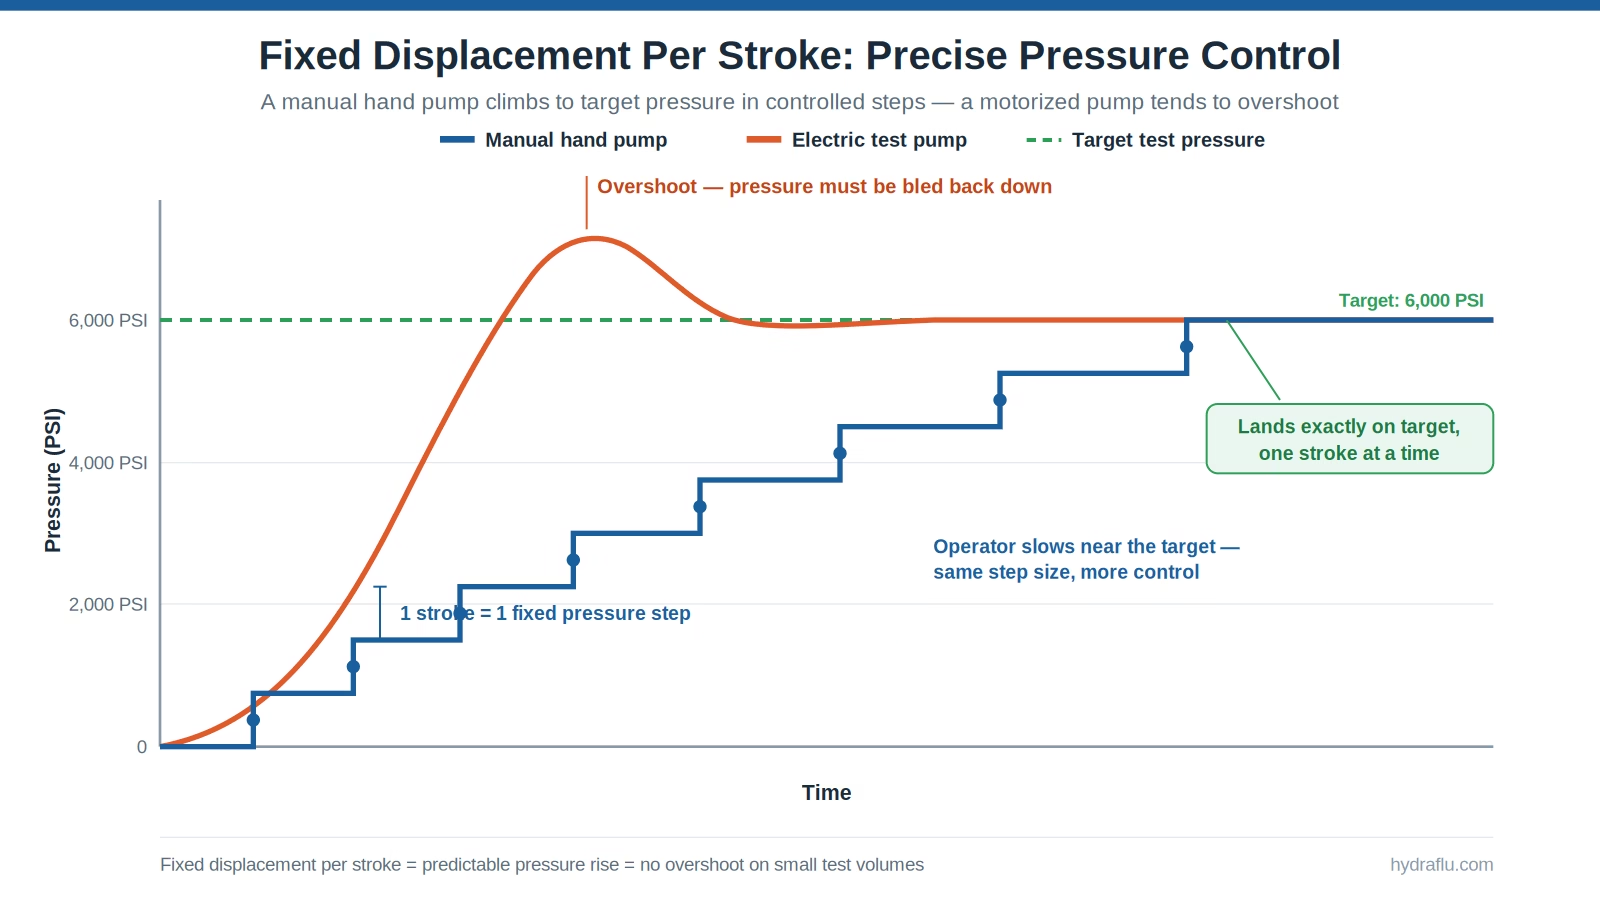
Ручной насос работает по одному принципу: фиксированное смещение за ход. Каждое нажатие на рычаг рукоятки вдавливает в систему одинаковый объем жидкости, поэтому давление повышается постепенно и предсказуемо.
(Полное описание внутренних компонентов – резервуара, поршня, обратных клапанов и камеры давления – смотрите здесь:) Что такое гидравлический ручной насос?)
Для проведения испытаний... ручной ручной насос высокого давления имеет четыре практических преимущества:
- Точный контроль давления: Оператор замедляет ход по мере приближения к целевому давлению и останавливается точно на заданном испытательном давлении, ход за ходом, не допуская превышения.
- Медленное и безопасное повышение давленияДавление повышается со скоростью, определяемой движением рукоятки, что предотвращает ударную нагрузку на испытываемый компонент.
- Электричество не требуется: Ручной гидравлический испытательный насос используется на стенде, в полевых условиях или там, где нет или запрещено использование электроэнергии.
- Портативность и низкие затраты на техническое обслуживание: Нет двигателя, нет проводки, меньше точек отказа.
 Ручной насос против электрического испытательного насоса – в чем разница?
 Ручной насос против электрического испытательного насоса – в чем разница?
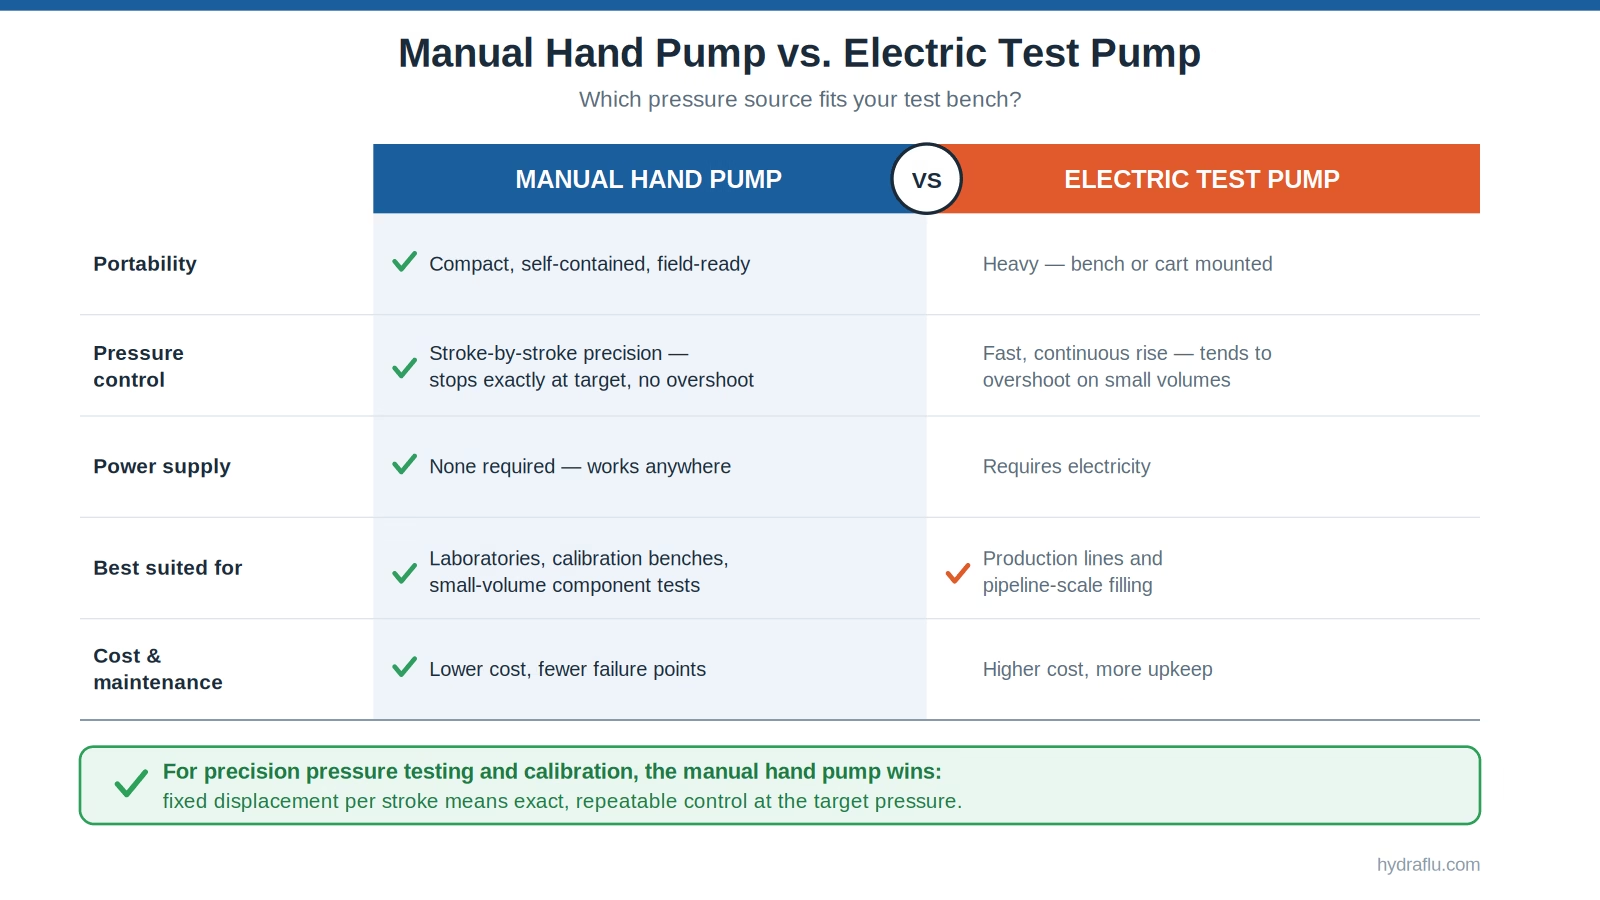
Оба инструмента создают испытательное давление, но решают разные задачи. Вот как они сравниваются по факторам, имеющим значение на испытательном стенде:
| Ручной насос | Электрический испытательный насос |
| Портативный, автономный | Тяжелый, устанавливаемый на верстак или тележку. |
| Точная регулировка каждого движения. | Более быстрое наполнение больших объемов. |
| Источник питания не требуется | Требуется электричество |
| Идеально подходит для лабораторных и мелкосерийных анализов. | Идеально подходит для работы в промышленных масштабах и на трубопроводах. |
| Снижение затрат и затрат на техническое обслуживание. | Более высокая стоимость, больше затрат на техническое обслуживание. |
Самое простое правило принятия решения: выбирайте электрический насос, когда скорость и объем имеют первостепенное значение, и ручной насос высокого давления, когда точность достижения заданного давления имеет первостепенное значение.
Как проводить гидростатические испытания труб, шлангов и клапанов с помощью ручного насоса?
 Как проводить гидростатические испытания труб, шлангов и клапанов с помощью ручного насоса?
Гидростатическое испытание отвечает на один простой вопрос: может ли этот компонент выдерживать давление без разрушения? Чтобы это выяснить, его заполняют жидкостью, накачивают до заданного испытательного давления и поддерживают это давление, наблюдая за утечками, просачиванием или любыми признаками деформации.
Если вы представляете себе гидростатические испытания как процедуру, проводимую на массивных трубопроводах, то представьте себе более мелкие детали. Тот же самый тест проводится каждый день на обычных рабочих столах — и там... ручной гидростатический испытательный насос является стандартным инструментом.
Это метод, используемый группами контроля качества для проверки гидравлических шлангов перед отгрузкой. Также именно так производители клапанов гарантируют герметичность каждого клапана, а ремонтные мастерские повторно сертифицируют трубы, фитинги, коллекторы и небольшие сосуды под давлением, прежде чем они будут возвращены в эксплуатацию.
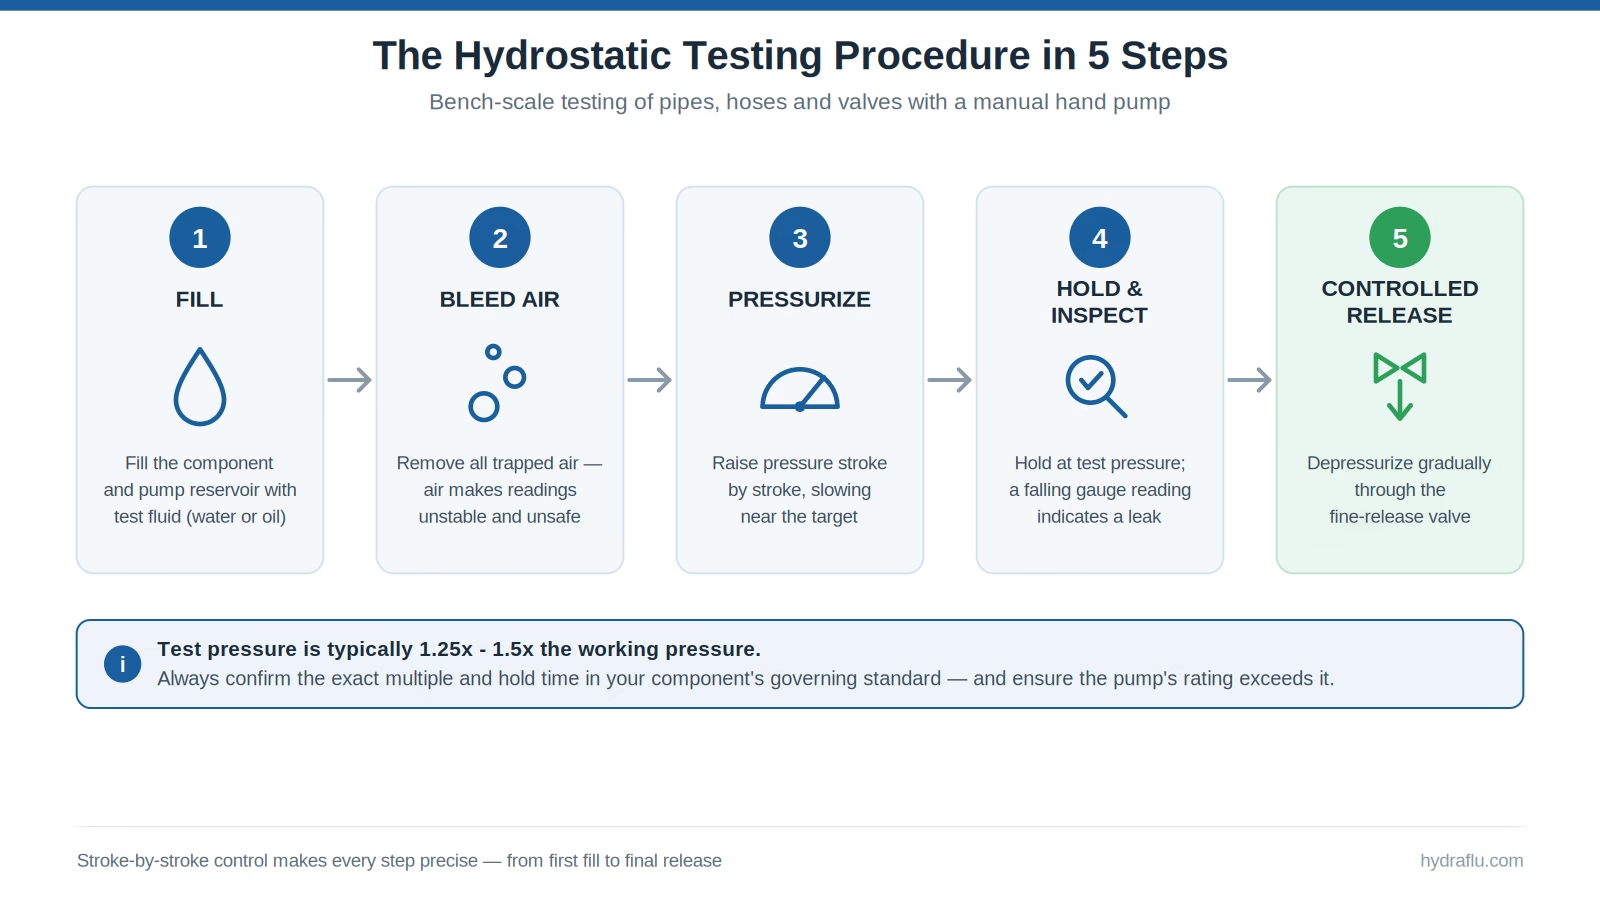
Типичная процедура гидростатических испытаний с использованием ручного насоса включает пять этапов:
- Наполнять Компонент и резервуар насоса с испытательной жидкостью (водой или гидравлическим маслом).
- Кровотечение Весь захваченный воздух — воздух сжимается, что делает показания нестабильными и небезопасным проведение теста.
- Создайте давление Качайте ногу за качением, следите за показаниями манометра и замедляйтесь, приближаясь к цели.
- Поддерживать и проверьте, прошло ли необходимое время – движение стрелки манометра вниз указывает на утечку.
- Сброс давления медленно отсоедините, используя “клапан точного сброса давления”.
Каким должно быть испытательное давление?
Это полностью зависит от действующих в вашем регионе стандартов. Многие спецификации на трубопроводы рекомендуют примерно в 1,25 раза превышать максимальное рабочее давление, в то время как стандарты на шланги и емкости часто требуют в 1,5 раза или более большего значения.
Какие бы цифры вы ни использовали, не берите их из блогов – включая этот. Точное испытательное давление и время выдержки указаны в спецификации вашего компонента, поэтому сначала проверьте её и убедитесь, что ваш насос рассчитан на нагрузку, значительно превышающую требуемые параметры испытания.
Вот как это выглядит на практике: Шланговый узел, рассчитанный на 4000 PSI, перед отправкой должен пройти испытание на прочность при 6000 PSI. Техник пошагово перемещает рукоятку, плавно поднимая давление до 6000 PSI по манометру, удерживая его в течение необходимого времени, и если стрелка не сдвинулась, шланг считается прошедшим испытание.
Калибровка манометра с помощью ручного насоса: манометры, датчики и переключатели.
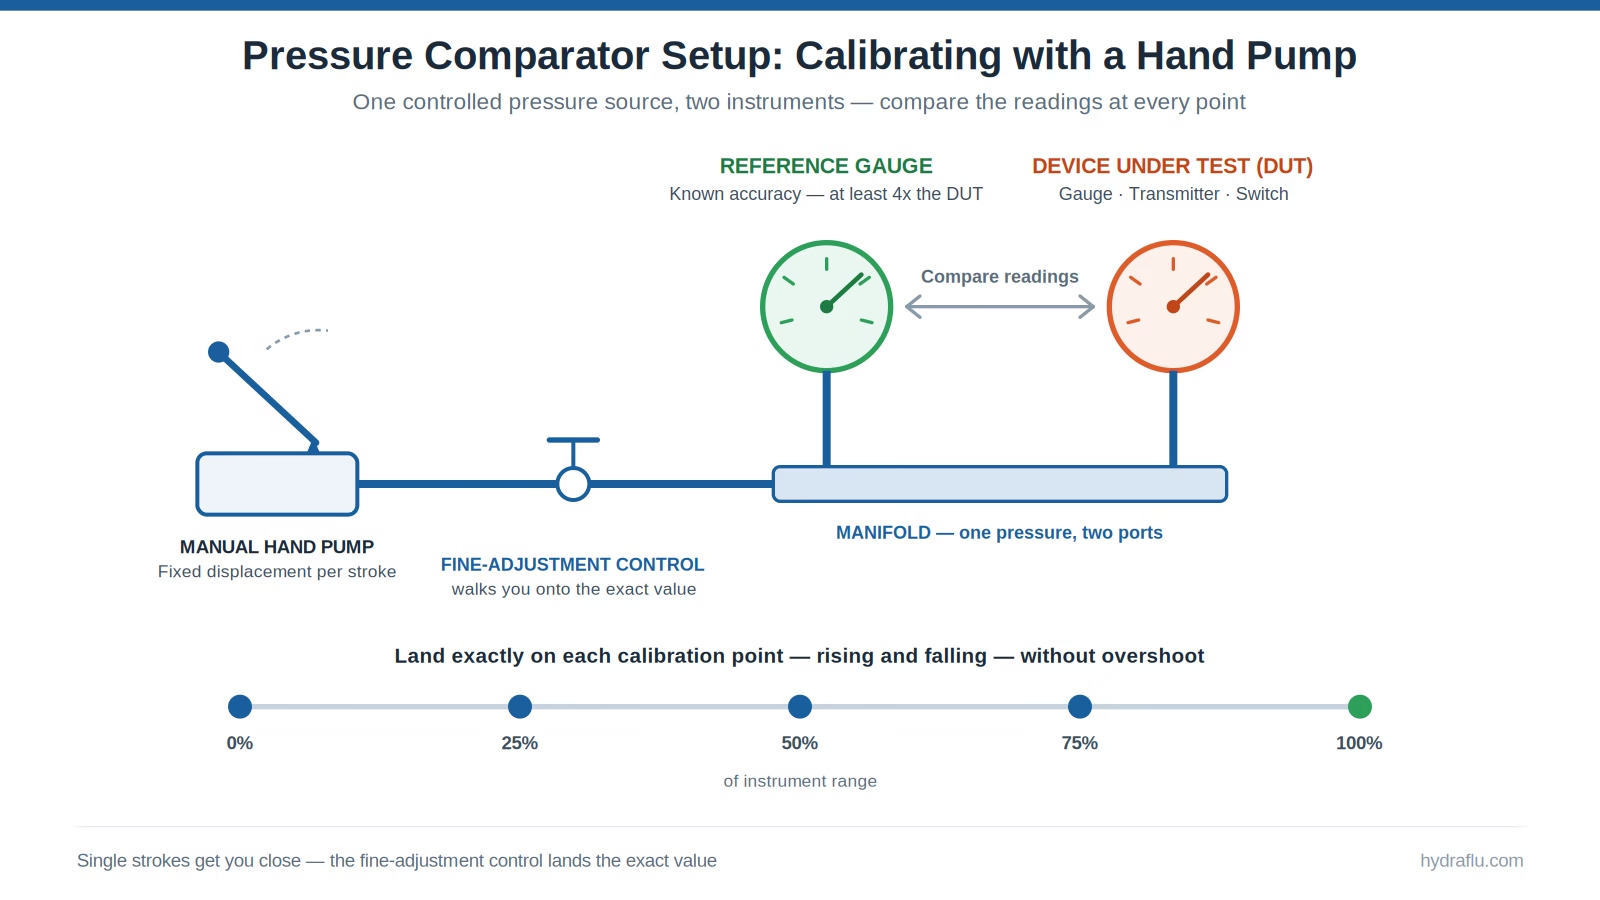
В лабораториях и метрологических помещениях ручной насос играет вторую роль: в качестве источника давления на калибровочном стенде. компаратор давления настраивать.
Принцип калибровки манометра основан на сравнении. Ручной насос подает точно контролируемое давление одновременно на два прибора — эталонный (основной) измерительный прибор известной точности и Испытуемое устройство (DUT).
Сам процесс требует терпения. Вы доводите давление до калибровочной точки, даёте ему немного времени стабилизироваться, а затем сравниваете показания двух приборов. На протяжении всего процесса важно одно правило: ваш эталонный манометр должен быть как минимум в четыре раза точнее, чем тестируемый прибор — иначе вы будете сравнивать одно предположение с другим.
Вот тут-то и может пригодиться ручной насос. Калибровка включает в себя точное попадание в каждую точку диапазона – обычно это 0%, 25%, 50%, 75% и 100%. Если происходит перерегулирование, значение возвращается на прежнее место. С ручным насосом такая точность является обычным делом – одного хода достаточно, чтобы приблизиться к нужному значению, а точная регулировка позволяет точно его установить.
Данная настольная установка предназначена не только для измерения параметров:
- Датчики давления: Выходной сигнал проверяется на соответствие приложенному давлению в заданном диапазоне.
- Реле давления: Для определения заданного значения переключателя требуется медленное, постепенное повышение давления, чтобы можно было точно зафиксировать давление срабатывания, а его дальнейшее снижение позволяет зафиксировать точку сброса, подтверждая наличие зоны нечувствительности. Пошаговое ручное управление делает это естественным образом; моторизованные системы справляются с этим плохо.
Выбор подходящего ручного насоса высокого давления для проверки и калибровки давления
 Выбор подходящего ручного насоса высокого давления для проверки и калибровки давления
Подберите насос в соответствии с вашей тестовой нагрузкой, используя следующие шесть критериев:
- Максимальное давление с запасом. Номинальное давление насоса должно значительно превышать максимальное испытательное давление, включая значения, в 1,25–1,5 раза превышающие рабочее давление. Для сложных работ обычно используются модели с давлением 10 000 PSI.
- Совместимость с рабочими жидкостями. Убедитесь, что уплотнения и внутренние детали рассчитаны на работу в вашей среде — вода для гидростатических испытаний без образования отложений, гидравлическое масло для работы под высоким давлением и калибровки.
- Смещение за один ход. Меньший рабочий объём означает более высокую точность измерения давления вблизи целевого значения, но большее количество ходов для заполнения объёма. Размер следует выбирать, исходя из объёма тестируемого образца и требуемой точности.
- Одноступенчатый или двухступенчатый. Для больших объемов, а двухступенчатый ручной насос Быстрое заполнение при низком давлении, затем переключение на стадию высокого давления для точного контроля.
- Размер водохранилища. Резервуар должен вмещать достаточно жидкости для максимального объема, необходимого для проведения испытания, без необходимости долива во время его проведения.
- Предохранительный клапан, выпускной клапан и соединения портов. Защита от избыточного давления, а Клапан точного сброса давления для контролируемого снижения давления, а также совместимость резьбы/муфты с вашими тестовыми соединениями.
Распространенные ошибки, которых следует избегать при проведении испытаний под давлением.
Даже при использовании подходящего насоса эти шесть ошибок ставят под угрозу результаты и безопасность:
- Запертый воздух В системе остаются нестабильные показания и опасная накопленная энергия.
- Неправильная тестовая жидкость для уплотнений насоса или материала компонента.
- Превышение номинального давления насоса, шланга, фитингов или манометра.
- Быстрое повышение давления Это приводит к ударной нагрузке на компонент, а не к постепенному нарастанию нагрузки.
- Неправильная техника свертывания крови — сброс давления происходит резко, а не через клапан точного сброса.
- Некалиброванный эталонный измерительный прибор — Точность любого результата зависит от точности используемого вами измерительного прибора.
Часто задаваемые вопросы
1. Может ли ручной насос достичь давления в 700 бар?
Да — 700 бар (10 000 PSI) — это стандартный класс давления для ручных насосов высокого давления, и модели для гидростатических работ доступны на этом уровне и выше.
2. Можно ли использовать воду для гидростатических испытаний?
Да, вода является стандартной средой для гидростатических испытаний и не оставляет следов. Просто убедитесь, что уплотнения вашего насоса рассчитаны на работу с водой, так как некоторые модели предназначены только для гидравлического масла.
3. В чём разница между пределом текучести и пределом прочности на разрыв?
Испытательное давление — это повышенное давление, которое компонент должен выдерживать без утечек или необратимой деформации; оно подтверждает наличие запаса прочности. Давление разрыва — это давление, при котором компонент фактически выходит из строя, определяемое с помощью разрушающих испытаний.
4. Как долго следует поддерживать гидростатическое давление?
Время выдержки устанавливается в соответствии с действующим стандартом для вашего компонента — обычно это от нескольких минут для стендовых испытаний до нескольких часов для трубопроводных систем. Всегда следуйте техническим условиям, а не общим правилам.
Заключение
От гидростатических испытаний шлангов, клапанов и сосудов до калибровки манометров на сравнительном стенде, ручной насос заслуживает своего места благодаря одному качеству: точному, контролируемому оператором созданию давления — в лаборатории или в полевых условиях, без необходимости использования источника питания.
Ассортимент продукции Hydraflu гидравлические насосы с ручным управлением Включает модели с давлением до 10 000 PSI, предназначенные для сложных испытаний и калибровки. Для получения помощи в выборе или расчета стоимости, свяжитесь с нашей командой по адресу info@hydraflu.com или по телефону +86 13651726370.

